HTML NOTES by idan3e5
All information is sourced from freeCodeCamp.com
Chapter 1
HTMLs role in the internet
HTML, which stands for Hypertext Markup Language, is a markup language for creating web pages. When you visit a website and see content like paragraphs, headings, links, images, and videos; that's HTML.
Here is a small example using HTML elements:
<h1>Main heading element</h1> = Main heading
element<p>I am a paragraph element.</p>
= I am paragraph element.
Elements
HTML represents the content and structure of a webpage through the use of elements. Most elements will have an opening tag and a closing tag. Sometimes those tags are referred to as start and end tags. In between those two tags, you will have the content. This content can be text or other HTML elements.
Both opening and closing tags start with a left angle bracket (<), and end with a right angle bracket (>), with the tag name placed between these angle brackets. While HTML tag names are case-insensitive, it is a widely accepted convention and best practice to write them in lowercase.
Here is a closer look at just the opening and closing paragraph tags:<p>EXAMPLE</p> = EXAMPLE
Void Elements
What distinguishes an opening tag from a closing tag is the forward slash (/) placed immediately after the left angle bracket in a closing tag. Some HTML elements do not have a closing tag. These are known as void elements.
Here is an example of an image element which is a void element:<img>
Notice that this image element does not have the closing tag and it does
not have any content. Void elements cannot have any content and only
have a start tag.
Sometimes you will see void elements that
use a / before the > like this:<img />
While many code formatters like Prettier, will choose to include the / in void elements, the HTML spec states that the presence of the / "does not mark the start tag as self-closing but instead is unnecessary and has no effect of any kind".
In real world development, you will see both forms so it is important to be familiar with both.
If you wanted to display an image, you will need to include a couple of attributes inside your image element. An attribute is a special value used to adjust the behavior for an HTML element, which brings us to our next chapter.
Chapter 2
Attributes
An attribute is a value placed inside the opening tag of an HTML element. Attributes provide additional information about the element or specify how the element should behave. Here is the basic syntax for an attribute:
<element attribute="value"></element>
The attribute name is followed by an equal sign (=) and a value in quotes. The value can be a string or a number, depending on the attribute.
HREF and TARGET Attributes
This first example uses the href and target attributes. The href attribute specifies the URL of a link and the target attribute specifies where to open the link.
<a href="https://www.freecodecamp.org" target="_blank">Visit
          freeCodeCamp</a>
Without the href attribute, the link would not work because there would be no destination URL. So you must include this href attribute to make the link functional. The target="_blank" enables the link to open in a new browser tab.
SRC and ALT Attributes
Other common attributes are the src, and alt, or alternative, attribute - which is used to specify the source of an image and provide alternative descriptive text for the image, respectively.
Example:
          <img
          src="corgishroom.jpeg"
          alt="A corgi in a mushroom costume." />
Here is an example of a working image:

Here is an example of a broken image link, where only the alt text is displayed:

Similar to the href attribute, the src attribute is required because it specifies the image file to be displayed. The alt attribute is not required, but it is recommended for accessibility purposes. Accessibility means making sure that everyone, including those with disabilities, can use and understand things like websites, apps, and physical spaces.
CHECKED Attribute
Some attributes are a little unique with their syntax like the checked attribute.
WITH <input type="checkbox" checked />
WITHOUT <input type="checkbox" />
In the following example, we have an input element with the type attribute set to checkbox. Inputs are used to collect data from users, and the type attribute specifies the type of input. In this case, this input is a checkbox.
The checked attribute is used to specify that the checkbox should be checked by default. The checked attribute does not require a value. If it is present, the checkbox will be checked by default. If the attribute is not present, the checkbox will be unchecked. This is known as a boolean attribute.
BOOLEAN Attributes
There are several common boolean attributes you will encounter in HTML, such as disabled, readonly, and required. These attributes are used to specify the state of an element, such as whether it is disabled, read-only, or required.
WITH <input type="text" disabled>
WITHOUT <input type="text">
HTML has many attributes that can be used to customize the behavior and appearance of elements on a webpage. Understanding how to use attributes is essential for creating interactive and accessible web content.
Chapter 3
LINK Element
The link element is used to link to external resources like stylesheets and site icons. Here is the basic syntax for using the link element for an external CSS file:
<link rel="stylesheet" href="./styles.css" />
The rel attribute is used to specify the relationship between the linked resource and the HTML document. In this situation, we need to specify that this linked resource is a stylesheet.
It is considered best practice to separate your HTML and CSS in different files. Developers will use the link element for their external CSS file instead of writing everything in the HTML document.
The href attribute is used to specify the location of the URL for the external resource.
The dot followed by a forward slash in the example tells the computer to look in the current folder, or directory, for the styles.css file.
Note: The link element should always be placed inside the head element.
Preconnect
A preconnect value for the rel attribute tells the browser to create an early connection to the value specified in the href attribute. This is done to speed up loading times for these external resources.
Example:
          <link rel="preconnect" href="https://fonts.googleapis.com" />
          <link rel="preconnect" href="https://fonts.gstatic.com" crossorigin
          />
          <link
          href="https://fonts.googleapis.com/css2?family=Playwrite+CU:wght@100..400&display=swap"
          rel="stylesheet"/>
Favicon
Another common use case for the link element is to link to icons. Here is an example of linking to a favicon:
Example:
<link rel="icon" href="favicon.ico" />
A favicon, which is short for favorite icon, is a small icon typically displayed in the browser tab next to the site title. A lot of websites will use a favicon to display their brand icon.
HTML Boilerplate
What is the HTML boilerplate, you ask? It's like a ready-made template for your webpages. Think of it as the foundation of a house. A boilerplate includes the basic structure and essential elements every HTML document needs. It saves you time and helps ensure your pages are set up properly.
Example:
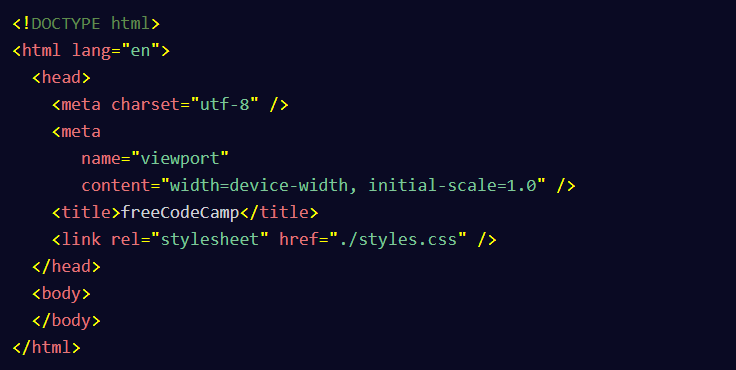
DOCTYPE declaration tells browsers which version of HTML you're using.
HTML wraps around all your content, and can specify the language of your page.
HEAD section contains important behind-the-scenes information.
BODY contains everything that is actually visible and displayed on the webpage.
META is your site's metadata, it has details like character encoding, and how websites like Facebook should preview your page's link.
TITLE determines the text that appears in the browser tab or window.
In summary, a boilerplate ensures your pages are structured correctly and work well across different browsers. Using a boilerplate helps you avoid common mistakes and follow best practices. It's a great starting point for any web project. Remember, you can customize your own boilerplate to fit your needs. As you gain experience, you might add your own preferred elements or meta tags.
UTF-8
UTF-8, or UCS Transformation Format 8, is a standardized character encoding widely used on the web. Character encoding is the method computers use to store characters as data. Essentially, all text on a web page is a sequence of characters stored as one or more bytes. In computing, a byte is a unit of data consisting of 8 bits, or binary digits. UTF-8 supports every character in the Unicode character set - and this includes characters and symbols from all writing systems, languages, and technical symbols.
Here is an example of using the meta element with the charset attribute to set the character encoding to UTF-8:
<meta charset="UTF-8" />
By setting the character encoding to UTF-8, it will ensure that the accented "e" character (é) is displayed correctly on the page.
For each new project you create, you should include this meta element with the charset attribute set to UTF-8.
Chapter 4
DIV Element
The div element is used as a container to group other elements.
Example:
<div>
<p>Example paragraph within div element.</p>
</div>
You will mainly use the div element when you want to group HTML elements that will share a set of CSS styles. You will learn more about CSS in future lessons and workshops.
Even though the div element is commonly used in real world codebases, you should be careful not to overuse it. There are times when another element would be more appropriate.
SECTION Element
If you wanted to divide up your content into sections, then the section element would be more appropriate than a div element.
Example:
<section>
<p>Example paragraph within section element.</p>
</section>
The section element has semantic meaning over the div element which is not semantic. Semantics are the meaning of words or phrases in a language. In HTML, which is a language, elements have their own semantic meaning too. So, this means if you use a section element, the browser will pick up its semantic meaning and understand to treat this as a section - on desktops, mobiles, you name it.
ID and CLASS Attribute
The id attribute adds a unique identifier to an HTML element.
Example:
<h1 id="title">Movie Review Page</h1> <h2
          id="subtitle">Shrek 2</h2>
You can reference the id name of title within your JavaScript or CSS. Here's a CSS example referencing the id of title to change the text color to red.
#title { color: blue; }
The hash symbol (#) in front of title, tells the computer you want to target an id with that value. id names should not be used more than once, and they should always be unique. Another thing to note about id values, is that they cannot have spaces in them.
Browsers will see this space as part of the id which will lead to unwanted issues when it comes to styling and scripting. id attribute values should only contain letters, digits, underscores, and dashes.
In contrast to the id attribute, the class attribute value does not need to be unique and can contain spaces.
Here is an example of applying a class called box to a div element.
<div class="box"></div>
If you wanted to add multiple class names to an element, you can do so by separating the names by a space. Here is an updated example applying multiple classes to a div element.
<div class="box red-box"></div>
HTML Entities
An HTML entity, or character reference, is a set of characters used to represent a reserved character in HTML.
Let's say you wanted to display the text This is an <img /> element on the screen. If you use the code currently in the editor, it won't display the desired result. Even if you added src and alt attributes to the example, it would show an image in the middle of the paragraph. Not the desired result.
When the HTML parser sees the less than (<) symbol followed by an HTML tag name, it interprets that as an HTML element.
To fix this issue, you can use < and > entities.
Example:
<p>This is an <img /> element</p> = This is
an <img /> element
Named Character Reference
These types of character start with an ampersand sign (&) and end with a semicolon (;). By using a named character reference, the HTML parser will not confuse this with an actual HTML element.
Decimal Numeric Reference
This character reference starts with an ampersand sign and hash symbol (#), followed by one or more decimal digits, followed by a semicolon.
Here is an example of using the decimal numeric reference for the less than symbol.
© = ©
® = ®
Hexadecimal Numeric Reference
This character reference starts with an ampersand sign, hash symbol, and the letter x. Then it is followed by one or more ASCII hex digits and ends with a semicolon.
          € = €

          Ω = Ω
SCRIPT Element
The script element is used to embed executable code. Most developers will use this to execute JavaScript code. JavaScript is used to add interactivity to your web pages. Common examples of using JavaScript include interactive games, image sliders, and dynamic forms that validate user input in real-time.
Example:
          <script>

          alert("Welcome to freeCodeCamp");

          </script>
While you can technically write all of your JavaScript code inside the script tags, it is considered best practice to link to an external JavaScript file instead. Here is an example of using the script element to link to an external JavaScript file:
<script src="path-to-javascript-file.js"></script>
The src attribute is used here to specify the location for that external JavaScript file. src stands for "source". The reason why it is not encouraged to place all of your JavaScript inside the HTML document is because of separation of concerns. Separation of concerns is a design principle where you separate your programs into distinct sections and have each section address a separate concern. In this case, we want to separate our JavaScript code from our HTML code.
Chapter 5
Meta Description
SEO, or Search Engine Optimization, is a practice that optimizes web pages so they become more visible and rank higher on search engines. One way to improve your site's SEO, is to provide a short description for the web page using the meta element.
Here is an example of using the meta element to set a page description for a gardening site:
          <meta name="description" content="Discover expert tips and
          techniques for gardening in small spaces, choosing the right plants,
          and maintaining a thriving garden." />
By setting the name attribute to description, it ensures that browsers, search engines, and other web tools correctly interpret this metadata. The content attribute is where you will place your description. It is recommended that you keep your descriptions short and concise. This is because search engines will often truncate the description based on the results page layout.
Similar to other types of meta elements, the meta description will not be visible on the web page itself. One place where the page description can be found is in the search engine results page snippet.
Even though meta descriptions won't directly affect a site's ranking on search engine, having a strong description could result in more traffic to your website.
Open Graph Tags
The open graph protocol enables you to control how your website's content appears across various social media platforms, such as Facebook, LinkedIn, and many more. By setting these open graph properties, you can entice users to want to click and engage with your content. You can set these properties through a collection of meta elements inside your HTML head section.
Title OG Property
Here is an example of setting the OG title for the freeCodeCamp homepage:
<meta content="freeCodeCamp.org" property="og:title" />
For the property attribute, you will need to specify that it is og:title. The content attribute is where you will write the title you want displayed for social media sites.
Type OG Property
Here is an example of using the OG type for the freeCodeCamp homepage:
<meta property="og:type" content="website" />
The type property is used to represent the type of content being shared on social media. Examples of this content include articles, websites, videos, or music.
Image OG Property
Here is an example of setting the OG image for the freeCodeCamp homepage:
          <meta
          content="https://cdn.freecodecamp.org/platform/universal/fcc_meta_1920X1080-indigo.png"
          property="og:image" />
In this example, the open graph image is pointing to the freeCodeCamp logo. All of these images should be high quality with good dimensions and ratios. Most social media platforms will include criteria for image requirements to help you ensure that your content displays well on their site.
For example, the developers.facebook.com documentation page states:
"use images that are at least 1200 by 630 pixels for the best display on high resolution devices. At the minimum, you should use images that are 600 by 315 pixels to display link page posts with larger images."
URL OG Property
Here is an example of setting the OG url for the freeCodeCamp homepage:
          <meta property="og:url" content="https://www.freecodecamp.org"
          />
There are many more OG properties that you can set, like description, audio, video and locale. However, the open graph url, image, type, and title are the most important ones to include.
So how do these open graph properties affect Search Engine Optimization? When your content is shared on social media, well-crafted OG properties can enhance the appearance for your content in users' feeds. This can lead to higher click-through rates which could signal to search engines that your content is relevant and engaging.
Chapter 6
Audio and Video Element
The audio and video elements allow you to add sound and video content to your HTML documents. The audio element supports popular audio formats like mp3, wav, and ogg. The video element supports mp4, ogg, and webm formats.
Audio Element
To include audio content on your web page, you can use the audio element with the src attribute pointing to the location of your audio file.
If you want to see the audio player on the page, then you can add the audio element with the controls attribute.
Example:
<audio src="Mundo.mp3" controls></audio>
The controls attribute enables users to manage audio playback, including pausing or resuming playback. The controls attribute is a boolean attribute that can be added to an element to enable built-in playback controls. If omitted, no controls will be shown.
Note: Some browsers, such as Safari, may not display a volume control by default even when the controls attribute is present.
Loop Attribute
Apart from the src and controls attributes, there are several other attributes that enhance the functionality of the audio element. The loop attribute is a boolean attribute that makes the audio replay continuously.
<audio src="Kabisado.mp3" loop controls ></audio>
Muted Attribute
Another attribute you can use is the muted attribute. When present in the audio element, this boolean attribute will start the audio in a muted state. Here's an example of using the muted attribute.
          <audio src="Sariling Multo.mp3" loop controls muted
          ></audio>
When it comes to audio file types, there are differences in which browsers support which type. To accommodate this, you can use source elements inside the audio element and the browser will select the first source that it understands.
Here's an example of using multiple source elements for an audio element:

The browser will first start with the ogg type, and if it can't play the audio, then it'll move down to the next type in the list.
Video Element
All the attributes we have learned so far are also supported in the video element.
Example:
          <video
          src="Noice.mp4"
          loop
          controls
          muted
          width="400"
          ></video>
You can also add the autoplay attribute to the opening video tag so the video plays automatically.
NOTE: The width attribute is being used here to make the video smaller and fit better in the preview window.
If you wanted to display an image while the video is downloading, you can use the poster attribute. This attribute is not available for audio elements and is unique to the video element.
Example:
          <video
          src="Noice.mp4"
          loop
          controls
          muted
          poster="Noice.jpeg"
          width="400"
          ></video>
You can also use the source element inside a video element, just like you did with the audio element. This lets you provide the same video in multiple formats, and the browser will choose the first one it can play.
Chapter 7
Image Optimization
Size - Scale your image to match the size it will be displayed at. Serving a large image that's styled small wastes bandwidth.
Format - PNG and JPG are common but outdated. Prefer modern formats like WEBP or AVIF for better optimization (unless supporting older browsers).
Compression - Use compression tools to reduce file size. Keep in mind:
- Lossless (e.g. PNG) — compresses without quality loss, original data is preserved
- Lossy (e.g. JPG) — permanently discards data each time it's re-saved, degrading quality over time
Image Licenses
By default, images are all rights reserved and owned by the creator. You can only use them if you:
- Get written permission from the copyright holder
- Purchase a license
- Use it under fair use (must be limited and transformative, e.g. commentary, parody)
Permissive Licenses (e.g. Creative Commons, BSD) are free to use but with conditions. Always read the license; you may be required to keep your site open source or avoid modifying the image.
Public Domain means no copyright and no restrictions. Images under the Creative Commons 0 (CC0) license fall into this category.
Tip: Search engines let you filter by license. Sites like Pixabay and Unsplash offer free-to-use images. Always check licensing before using an image.
SVGs (Scalable Vector Graphics)
Common formats like PNG and JPG are raster-based (pixel-based). Their downside is they become pixelated or blurry when scaled up.
SVGs are vector-based, meaning they use paths and equations instead of pixels. This allows them to scale to any size without losing quality.
Additional benefits of SVGs:
- Data is stored in XML, so you can use them directly in HTML with the <svg> element
- Colors and properties can be changed programmatically via attributes like fill
Key SVG elements:
- <svg> - the container for the entire drawing
- <circle> - draws circles
- <path> - draws lines and curves
- Each element has attributes controlling its appearance and position
When to use SVGs:
- Icons (e.g. social media icons, custom bullet points)
- Logos (scales perfectly for any screen size)
- Any graphic that needs to adapt to responsive layouts
Tip: Open any SVG file in a text editor to view and edit its code directly.
SVG Code Sample:
          <svg width="24" height="24" viewBox="0 0 24 24" fill="red">
          <path d="M12 21s-6-4.35-9.33-8.22C-.5 7.39 3.24 1 8.4 4.28 10.08
          5.32 12 7.5 12 7.5s1.92-2.18 3.6-3.22C20.76 1 24.5 7.39 21.33 12.78 18
          16.65 12 21 12 21z" ></path>
          </svg>
Output sample:
Chapter 8
Replaced Elements
A replaced element is an element whose content is determined by an external resource rather than by CSS itself. CSS, or cascading stylesheets, is used to add styles to a web page. Common examples of replaced elements include the image, iframe, and video elements.
With replaced elements, you can control the position, or layout of an element. But your CSS cannot directly modify the content of that element. This might be easier to explain with some examples. Consider the image element, which embeds an image on your web page:
<img src="example-img-url" alt="Descriptive text goes here">
The element itself is replaced with the external object: the image. Your CSS can control things like the positioning of the image, or apply a filter to it, but you cannot actually modify the image itself. A more robust example might be the iframe element, which embeds an external site on your web page.
Here is an example of using the iframe element for a popular YouTube video on the freeCodeCamp channel. If you want to see different videos in the preview window, change the value of the src attribute to a video of your choosing.
NOTE: Don't worry about the extra attributes mentioned in the interactive example like referrerpolicy and allowfullscreen. You will learn more about working with iframe elements in a future workshop.
<iframe width="400" height="200" src="https://www.youtube.com/embed/u43gJJrVa1I?si=BoDW_puFsy8OEr_Z"
        title="Professional Cloud Architect Certification Course Pass the Exam! (YouTube video)" allow="accelerometer;
        autoplay; clipboard-write; encrypted-media; gyroscope; picture-in-picture; web-share" referrerpolicy="strict-
        origin-when-cross-origin"allowfullscreen></iframe>
Other common examples of using the iframe element would be to embed maps onto the page. Here is an example of an embedded map.
        <iframe
        title="Map of the Royal Observatory, Greenwich, London"
        width="300"
        height="200"
        src="https://www.openstreetmap.org/export/embed.html?bbox=-0.004017949104309083%2C51.47612752641776%2C0.00030577182769775396%2C51.478569861898606&layer=mapnik">
        </iframe>
The element itself is replaced with the external object: the site. Your CSS can change the positioning of the embedded site, but you cannot modify the site's contents. To dive a bit further, if the embedded site has an h1 element, your CSS would not be able to style that h1 element. You cannot change the size, font color, and so on.
There are some other replaced elements, such as video, and embed. And some elements behave as replaced elements under specific circumstances. Here's an example of an input element with the type attribute set to image:
<input type="image" alt="Descriptive text goes here"
        src="example-img-url" />
This type of input is considered to be a replaced element, but other input types like text, or email are not replaced elements.
How to Embed Videos using iframe Element
iframe element stands for inline frame. It's an inline element used to embed other HTML content directly within the HTML page. That HTML content could be a video, map, another HTML element, or even other web pages.
Here's an example of embedding a popular freeCodeCamp course from YouTube.
        <iframe
        width="400"
        height="400"
        src="https://www.youtube.com/embed/PkZNo7MFNFg?si=-UBVIUNM3csdeiWF"
        title="Learn JavaScript - Full Course for Beginners (YouTube video)"
        allow="accelerometer; autoplay; clipboard-write; encrypted-media; gyroscope; picture-in-picture; web-share"
        referrerpolicy="strict-origin-when-cross-origin"
        allowfullscreen
        ></iframe>
The src attribute specifies the URL of the page you want to embed. The width attribute specifies the width of the iframe. The height attribute specifies the height of the iframe. The allowfullscreen attribute allows the user to display the iframe in full screen mode. It's also a good practice to specify a title attribute for the iframe, as it's important for accessibility.
The allow attribute, on the other hand, lets you define what an iframe can or can't do. This is called an allowlist. In the above example, adding clipboard-write to it allows the embedded page to write items to your clipboard. Items in an allowlist can be separated by semicolons or spaces, and both can be used together.
Note that the video can come from anywhere. It doesn't have to come from video services like YouTube and Vimeo.
Don't forget you can also embed a map, another web page, or direct HTML within the iframe element. Here is an example of an embedded map.
        <h1>A Map from Openstreetmap.org Embedded with the iframe Element</h1>

        <iframe
          width="425"
          height="350"
          src="https://www.openstreetmap.org/export/embed.html?bbox=3.006134033203125%2C6.150112578753815%2C3.6357879638671875%2C6.749850810550778&layer=mapnik"
          title="Map of Lagos area, Nigeria"
          style="border: 1px solid black"
        >
        </iframe>
        <br />
        <small>
          <a href="https://www.openstreetmap.org/#map=11/6.4501/3.3210">
            View Larger Map
          </a>
        </small>
If you want to embed direct HTML within the iframe element you have to use the srcdoc attribute instead of src.